How to Maintain a Tankless Water Heater with These 5 Easy Steps

Tankless Water Heater Maintenance: The Five Steps That Matter

Check for leaks and error codes monthly. Every six months, clean the inlet water filter. About once a year, shut down and isolate the unit, clean its filters, connect a flush kit, circulate an approved descaler, then rinse and restart it. If you have hard water or use a lot of hot water, you may need to descale every six months. Follow your model’s manual, and leave gas vent and combustion checks to a qualified technician.
I’m Adam Wettach, owner of All Star Service & Repair. My hands-on plumbing experience, from routine repairs to water heater replacements, shapes this practical approach to tankless water heater maintenance.

Why Regular Descaling and Upkeep Matter for Modern Units
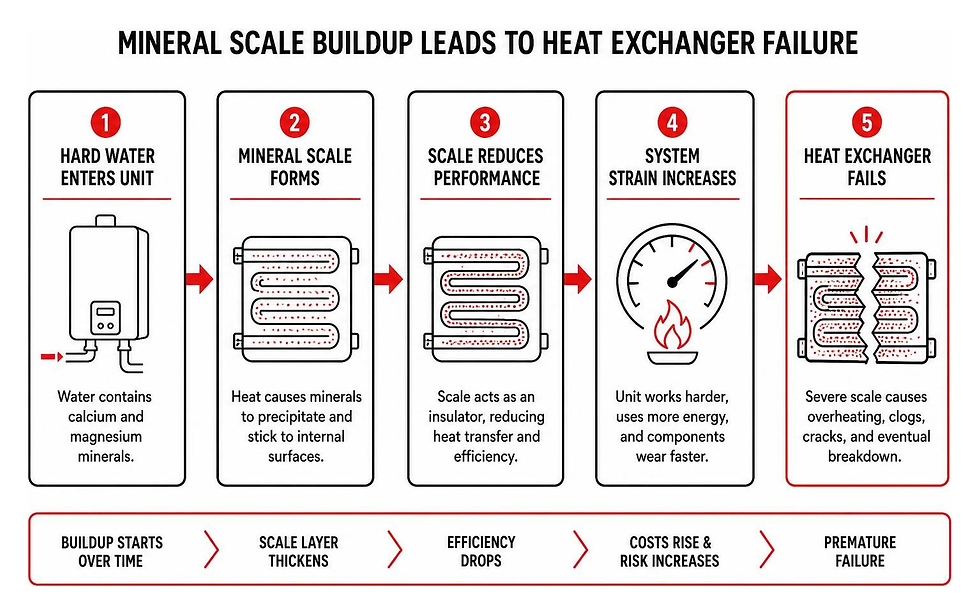
Tankless water heaters are renowned for delivering endless hot water on demand while occupying a fraction of the space required by conventional storage tanks. However, because these systems flash-heat water across narrow copper or stainless steel heat exchanger passages at internal temperatures ranging from 140°F to 180°F, they are highly vulnerable to mineral precipitation.
When water is heated rapidly, naturally dissolved calcium and magnesium ions crystallize and bind to the metallic walls of the heat exchanger. This chalky buildup, known as mineral scale, acts as a thermal insulator. Just a thin layer of scale forces your unit's burners or electrical elements to work significantly harder to transfer heat into the water. Left unchecked, scale accumulation can reduce heat-transfer efficiency by up to 30% and force the unit to consume substantially more fuel, adding $200 to $400 per year in wasted energy expenses.
A well-cared-for tankless system is engineered to deliver a 20- to 25-year service life. By contrast, a neglected system frequently suffers catastrophic failure within 8 to 12 years. Scale buildup accounts for 80% to 90% of all premature tankless water heater breakdowns. In areas with high mineral concentrations, installing a water softener for your tankless water heater significantly reduces mineral precipitation, although periodic flushing remains essential to protect your investment. Following proper water heater maintenance guidelines ensures that internal components stay clean and operating at peak performance.
Factor | Properly Maintained Tankless Unit | Neglected Tankless Unit |
Expected Lifespan | 20–25 Years | 8–12 Years |
Operating Efficiency | Stays within 95–98% of factory specs | Loses 15–30% thermal efficiency |
10-Year Ownership Cost | $3,500–$5,500 (Includes upkeep) | $5,700–$11,300 (Repairs & premature swap) |
Risk of Unscheduled Outages | Very Low (10–15% over lifespan) | Extremely High (Frequent error codes) |
Warranty Status | Fully compliant | Voided for scale-related component failure |
How to Maintain a Tankless Water Heater in 5 Easy Steps
Carrying out an annual system flush is straightforward when your unit is equipped with dedicated service isolation valves. Before you begin, gather the necessary gear: a 5-gallon bucket, two standard washing machine connection hoses, a 1/6 HP or 1/4 HP submersible utility pump, and an approved descaling solution (or four gallons of virgin white distilled vinegar). You can check our best tankless flush kit guide for recommended equipment and setup advice.

Step 1: Shut Off Power and Isolate Water Lines
Safety comes first. Start by cutting all power to the appliance. For an electric model, flip the dedicated dual-pole circuit breaker at your main electrical panel. For a gas unit, unplug the power cord or switch off its electrical disconnect switch, then turn the manual gas isolation valve handle clockwise until it sits perpendicular to the gas supply pipe.
Next, isolate the plumbing lines from your household water system:
Turn the main cold water inlet valve (blue handle) perpendicular to the pipe to stop incoming water.
Turn the hot water outlet valve (red handle) perpendicular to the pipe to close off your home's hot water lines.
Remove the protective brass caps from the service purge ports on both the cold and hot isolation valves.
Slowly open the cold and hot service port valves to release internal line pressure into a small bucket.
Step 2: Clean the Inlet Water Filter and Air Screen
Sediment, rust flakes, and municipal debris accumulate in the cold water inlet filter screen over time, restricting overall flow. Locate the plastic or brass filter housing near the cold water connection underneath the unit. Unscrew the plug by hand or using an adjustable wrench, pull out the cylindrical screen, and rinse it under running tap water. Use a soft nylon brush to dislodge stubborn grit before seating the filter back into place and hand-tightening the cap.
If you are servicing a gas-fired unit, inspect the combustion air intake screen located on the top or exterior casing of the heater. Clear away any accumulated dust, lint, or outdoor debris to ensure the burner receives adequate airflow for clean combustion, following standard instructions to clean a tankless water heater.
Step 3: Connect the Submersible Pump and Flush Kit
Place your 5-gallon bucket directly underneath or beside the tankless unit. Submerge your utility pump in the center of the bucket.
Connect the first washing machine hose to the threaded discharge port of the submersible pump.
Thread the opposite end of this hose onto the cold water service port (blue valve).
Connect the second hose to the hot water service port (red valve).
Direct the open end of the second hose straight down into the bucket so returning fluid drains freely.
Pour approximately 3 to 4 gallons of undiluted white distilled vinegar or your manufacturer-approved, non-toxic descaling solution into the bucket, ensuring the pump intake is completely covered.
Step 4: Circulate the Descaling Solution for 45 to 60 Minutes
Ensure that both the cold and hot service port purge valves are turned to their fully open positions while the main household isolation valves remain closed. Plug in the submersible pump to begin closed-loop circulation.
The pump will draw solution from the bucket, push it up through the cold water inlet, force it across the narrow internal heat exchanger channels, and discharge it back into the bucket through the hot service line. Within 10 to 15 minutes, you will likely notice the clear solution turning cloudy, bluish, or foaming as it dissolves calcium carbonate deposits. Allow the pump to circulate continuously for 45 to 60 minutes. Keep an eye on the fluid level in the bucket to prevent the pump from running dry.
Step 5: Flush with Clean Water and Restore Operation
Once the descaling cycle is finished, unplug the submersible pump. Discard the spent cleaning fluid responsibly down a household drain.
Close the cold water service purge valve and disconnect the supply hose from the pump.
Leave the hot water service hose attached, pointing its discharge end into the empty bucket or a nearby floor drain.
Slowly open the main cold water inlet valve to allow fresh municipal water to flow through the heat exchanger and exit out the hot service port.
Run fresh cold water through the unit for at least five minutes (roughly 10 to 15 gallons) to thoroughly clear out any leftover acidic solution and loose mineral particles.
Close the hot service purge valve, remove the drain hose, and securely screw the brass service caps back onto both ports.
Open both main cold and hot water valves back to their operating positions.
Open a hot water faucet inside your home for two to three minutes to purge trapped air from the plumbing lines until the stream runs steady without sputtering.
Restore the electrical power and open the manual gas shutoff valve. Inspect all valve connections and filter caps closely for minor drips.
A Complete Tankless Water Heater Maintenance Schedule
The ideal maintenance schedule for your tankless water heater depends on your household's water hardness, measured in grains per gallon (GPG) or milligrams per liter (mg/L), as well as your daily hot water demand. Using a comprehensive tankless water heater maintenance checklist helps track these recurring tasks over the life of your equipment.
Monthly Tasks (5 Minutes): Visually inspect the casing for water drips, check venting joints for corrosion, and verify that the digital display is free of warning codes.
Semi-Annual Tasks (15–30 Minutes): Remove and rinse the cold water inlet filter screen. Clear dust from external air intake grates and check that the condensate drain line runs clear.
Annual Tasks (1–2 Hours): Perform a full descaling flush using an approved solution, test the temperature and pressure (T&P) relief valve lever, and review system operating temperatures.
Water Quality Category | Hardness Level (GPG / mg/L) | Recommended Descaling Frequency | Additional Actions |
Soft Water | 0–3 GPG (0–50 mg/L) | Every 18–24 Months | Standard annual filter checks |
Moderate Water | 3.5–7 GPG (60–120 mg/L) | Every 12 Months | Semi-annual inlet filter rinses |
Hard Water | 7.5–10.5 GPG (130–180 mg/L) | Every 6–9 Months | Install scale reduction filter |
Very Hard / Well Water | 11+ GPG (190+ mg/L) | Every 3–6 Months | Dedicated water softener strongly advised |
Staying mindful of these intervals will help you recognize top signs your water heater needs repair or replacement before minor scale issues escalate into costly emergencies.
Gas vs. Electric Tankless Water Heater Maintenance
While both styles require descaling, their operational components call for different maintenance tasks:
Gas Units: These systems feature sealed combustion chambers, spark igniters, flame sensors, and specialized exhaust venting (such as Category III stainless steel or direct-vent PVC/polypropylene). You must periodically check that the venting joints are airtight and free of blockages from bird nests or debris. Condensing gas models also produce acidic condensate that drains through internal trap assemblies; these drain lines must be inspected for clogs to prevent backup into the burner box.
Electric Units: These models feature high-amperage electrical connections and heating element banks. They require inspection of electrical terminal wiring for loose lugs, scorching, or corrosion caused by thermal cycling. Always make sure you understand proper electric tankless water heater installation requirements when checking breaker sizes, wiring gauges, and internal heating elements.
When to Call a Professional for Tankless Water Heater Maintenance
While basic flushing is a practical DIY job for many homeowners, certain diagnostic and safety tasks require licensed plumbing and HVAC technicians. Reach out to a professional if:
Your heater was installed without isolation service valves, meaning purge ports must be professionally retrofitted into your copper or PEX lines.
The unit displays persistent error codes (such as ignition failure, flame rod failure, or exhaust overheat) that remain after a system flush.
You smell fuel gas or notice scorch marks, soot accumulation, or melting plastics near the cabinet or venting joints.
You need internal gas pressure checks (manifold and inlet pressure adjustments) or an annual combustion analysis.
Scheduling a professional water heater inspection or setting up annual water heater tune ups ensures your unit's internal safety controls and combustion parameters are accurately calibrated with specialized test equipment.
Warning Signs Your System Needs Immediate Service

Tankless water heaters will often signal that mineral deposits are restricting internal flow or causing localized overheating well before complete failure occurs. Watch out for these warning signs:
Temperature Fluctuations ("Cold Water Sandwiches"): If your shower randomly alternates between hot and icy water, scale buildup may be delaying the flow sensor or insulating temperature thermistors.
Noticeable Drop in Water Pressure: As calcium deposits narrow the interior diameter of heat exchanger tubing, hot water fixtures will experience a sharp reduction in flow compared to cold-only taps.
Kettling and Popping Sounds: Mineral scale creates insulated pockets where trapped water superheats, boils instantly, and generates steam bubbles. If you notice unusual noises, take time for addressing that water heater popping noise promptly to protect the heat exchanger from thermal stress fractures.
Moisture Under the Unit: Internal pressure spikes can cause the pressure relief valve to weep, or acidic condensate may back up and leak through internal seals. Knowing the right steps when troubleshooting a water heater that is leaking can help prevent water damage to surrounding drywall and flooring.
Frequently Asked Questions About Tankless Unit Care
Can I use regular white vinegar instead of commercial descaling solution?
Yes, virgin white distilled vinegar (5% acidity) is widely recommended by leading manufacturers because it effectively dissolves calcium carbonate without damaging the protective oxide layers on copper and stainless steel heat exchangers. It is non-toxic, inexpensive, and safe to dispose of down household drains.
Commercial descaling solutions formulate fast-acting citric or phosphoric acid blends that can dissolve heavy scale in 20 to 30 minutes, compared to 45 to 60 minutes for vinegar. However, never use harsh industrial chemicals or muriatic acid, as these can pit the heat exchanger walls and cause pinhole leaks.
How much does professional service cost compared to DIY supplies?
Assembling your own DIY flush kit (submersible pump, two utility hoses, bucket, and initial descaling solution) requires an upfront investment of approximately $100. After that, each subsequent DIY flush costs only $10 to $30 for vinegar or descaler.
By comparison, scheduling a professional flush and multi-point inspection typically costs between $150 and $350. Investing in either approach is far more economical than paying $600 to $1,500 for a replacement heat exchanger or $2,500 to $5,000 for a brand-new system installation. If you notice persistent mechanical faults during service, contacting a technician for professional water heater repair will quickly get your hot water running smoothly again.
Does skipping annual maintenance void my manufacturer warranty?
Yes. Leading tankless manufacturers (including Rinnai, Navien, and Rheem) state in their warranty terms that component failures caused by mineral scale, sediment, or improper water quality are not covered under standard warranty protections.
For instance, Rheem requires water hardness levels of 200 mg/L (approximately 11.7 GPG) or less for scale damage coverage, and nearly all manufacturers exclude heat exchanger burnouts directly attributable to lime accumulation. Keeping a written log of your descaling dates alongside product purchase receipts protects your coverage should you ever need to submit a warranty claim.
Conclusion
Carrying out routine tankless water heater maintenance requires only an hour of attention each year, but it delivers substantial returns across the life of your equipment. Keeping internal heat exchanger channels clean ensures your system delivers peak energy efficiency, uninterrupted water pressure, and dependable hot water for over twenty years.
If your system is overdue for a flush, lacks service isolation valves, or continues to display persistent error codes, let our team lend a hand. At All Star Service & Repair, we take pride in delivering honest, upfront pricing and dependable workmanship across Provo and Northern Utah. Whether you need an annual inspection, an emergency repair, or are interested in upgrading to a high-efficiency Navien tankless water heater, our licensed plumbers are here to keep your home's hot water running strong.


Comments