How to Install a Kitchen Sink Drain in Under an Hour

Essential Tools and Materials for the Job

Changing a kitchen sink drain means removing the old basket strainer, cleaning the sink opening, sealing the new flange with plumber's putty or silicone, securing the rubber gasket and locknut underneath, and reconnecting the P-trap. Before crawling under the cabinet, gather your tools and replacement parts in advance. Having everything within arm’s reach keeps you from making repeated trips out from under the sink.
Required Tools
Large tongue-and-groove pliers (Channel Locks): Essential for gripping large drain locknuts and slip joints.
Basin wrench or spud wrench: Helpful for tight spaces behind deep sink basins.
Plastic putty knife or scraper: For safely removing old sealant without scratching stainless steel, porcelain, or composite surfaces.
Small hacksaw or PVC pipe cutter: For sizing replacement tailpieces or trap arms if needed.
Small bucket and old towels: To catch residual water trapped in the drainage pipes.
Flashlight or headlamp: Under-sink cabinets have limited visibility.
Required Materials
New kitchen sink basket strainer assembly: Includes the top flange, strainer body, rubber sealing gasket, friction washer, and locknut.
Plumber’s putty or 100% silicone sealant: Used to create a watertight seal between the sink basin and the upper flange.
Replacement 1-1/2 inch tailpiece and flanged tailpiece washer: Connects the bottom of the strainer to your drain pipes.
1-1/2 inch slip-joint washers and nuts: Ensures leak-proof joints throughout the trap assembly.
Penetrating oil (such as WD-40): Frees corroded metal nuts on older installations.
Sealant Type | Best Used For | Set/Cure Time | Ease of Cleanup | Pros & Cons |
Plumber's Putty | Stainless steel, cast iron, porcelain | Immediate testing allowed | Wipes clean easily with a dry rag | Pros: Easy to mold, stays workable. Cons: Can stain natural stone and granite. |
100% Silicone Sealant | Granite, quartz, composite stone, marble | Needs 24 hours to fully cure | Requires mineral spirits or denatured alcohol | Pros: Non-staining, flexible bond. Cons: Requires wait time before water testing. |
Step-by-Step Guide to Changing Kitchen Sink Drain Assemblies
Changing an old kitchen sink drain assembly involves disassembling the existing drainage system, thoroughly preparing the sink surface, and installing the new basket strainer securely.
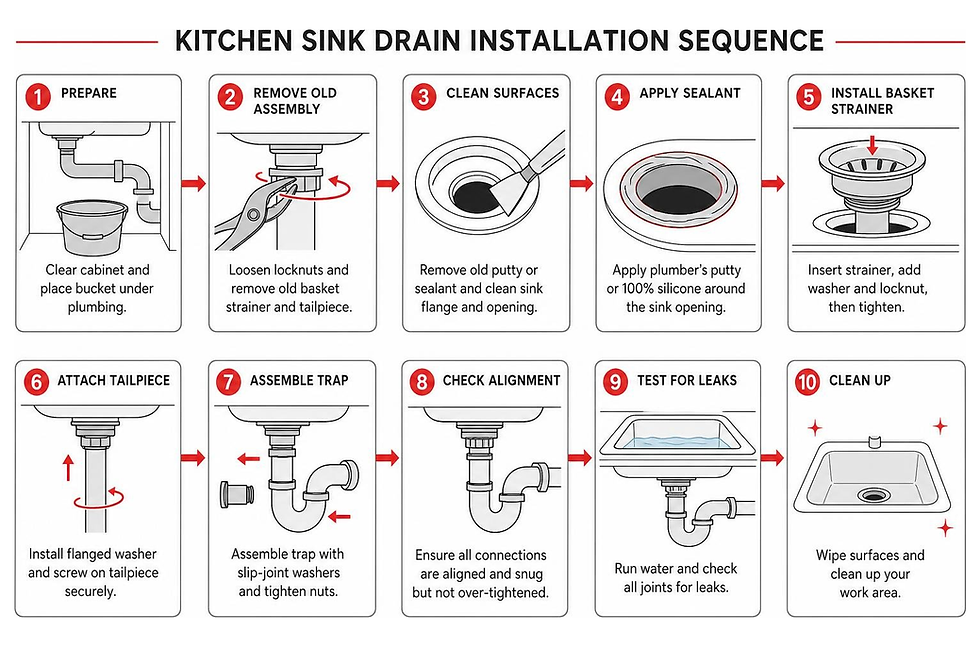
Preparation and Safety Before Changing Kitchen Sink Drain Strainers
Preparation prevents water spills inside your cabinet.
Clear the cabinet: Empty all cleaning supplies, bins, and small appliances from beneath the sink to give yourself plenty of workspace.
Disconnect power: If your kitchen sink setup includes an attached garbage disposal or an under-sink instant hot water dispenser, unplug the units or flip the corresponding circuit breaker at your main electrical panel.
Shut off the water: Turn the hot and cold water shut-off valves clockwise until fully closed to prevent accidental fixture activation while working.
Position your bucket and towels: Place a shallow bucket directly under the P-trap to collect any standing water left inside the trap bend. If the under-sink piping shows extensive corrosion or pipe degradation, scheduling professional residential drain repair can help resolve underlying issues safely.
Removing the Old Basket Strainer and Drain Flange
Disconnect the tailpiece: Loosen the top slip nut connecting the vertical tailpiece to the bottom of the basket strainer using your channel locks. Slide the nut and washer down the pipe.
Remove the P-trap: Loosen the slip nuts securing the curved P-trap to the tailpiece and the wall arm. Lower the trap into your bucket to drain any trapped water.
Loosen the large locknut: Underneath the sink, locate the large metal locknut holding the strainer body against the bottom of the basin. Turn the nut counterclockwise using large channel locks or a spud wrench.
Tip for stuck or corroded nuts: Spray penetrating oil generously onto the threads and wait 15 to 30 minutes. If the nut remains frozen, gently heat the metal ring using a hair dryer to expand the metal slightly, or use a screwdriver wedged into the strainer’s bottom notches from above to prevent the body from spinning.
Extract the old strainer: Once the locknut is unthreaded, push the strainer body up from below to break the seal. Lift the strainer out from the top of the basin.
Clean the sink opening: Scrape away all remnants of dried plumber’s putty, old silicone, and mineral scale using a plastic putty knife. Wipe the surface clean and dry it completely. A clean, smooth surface is required to achieve a leak-proof seal with the new drain flange.
Applying Sealant and Positioning the New Strainer Flange
Prepare the sealant:
For Stainless Steel or Porcelain: Take a golf-ball-sized piece of plumber's putty and roll it between your palms into an even rope approximately 1/4-inch thick and long enough to circle the drain opening. Press the putty rope evenly around the underside rim of the new basket strainer flange.
For Granite, Quartz, or Composite Stone: Apply a continuous, generous bead of 100% silicone sealant around the underside of the flange to avoid oil discoloration on porous surfaces. Reviewing proper sink drain installation techniques helps clarify correct material selection for specific basin types.
Seat the flange: Lower the new strainer assembly straight down into the center of the sink hole. Press down firmly with even hand pressure so the sealant squishes slightly around the edges, confirming complete contact with the basin surface.
Installing Gaskets, Washers, and Securing the Locknut
Working from beneath the sink cabinet, install the mounting components in their proper sequence:
Install the rubber gasket: Slide the thick rubber gasket over the threaded strainer body until it rests directly against the underside of the sink basin. This gasket creates the primary bottom seal against water leakage.
Install the friction washer: Place the thin cardboard or paper friction washer directly below the rubber gasket. This washer reduces friction, allowing the metal locknut to rotate smoothly without pinching, warping, or tearing the rubber seal during tightening. You can also view a strainer replacement walkthrough to see the friction washer placement in real time.
Thread the locknut: Thread the large metal locknut onto the strainer body by hand, turning it clockwise until snug against the friction ring.
Tighten the assembly: Use channel locks or a spud wrench to tighten the locknut firmly. Hold the top strainer body steady from above using a pair of pliers inserted into the basket crossbars if it begins to spin.
Remove excess sealant: Return to the top of the sink and peel away the excess plumber’s putty that squeezed out around the perimeter of the flange using your plastic scraper or a soft cloth. If using silicone, wipe the perimeter clean with a rag dampened with mineral spirits or denatured alcohol.
Connecting the Tailpiece, P-Trap, and Wall Drain

Attach the flanged tailpiece: Insert a flanged rubber or plastic tailpiece washer into the top flared rim of your brass or PVC tailpiece. Thread the tailpiece coupling nut onto the bottom threads of the newly installed strainer basket and tighten it firmly.
Position slip-joint washers: Slide a slip nut followed by a beveled slip-joint washer onto each connecting pipe. Ensure the tapered (beveled) edge of each washer faces toward the joint opening in the direction of water flow.
Align the P-trap and wall stub-out: Reconnect the curved P-trap to both the vertical tailpiece and the horizontal drain arm extending from the wall. Verify that the horizontal run maintains a downward slope of at least 1/4-inch per foot toward the wall connection for proper gravity flow. Correct pipe slope is essential for conquering slow draining kitchen sinks and preventing debris buildup.
Hand-tighten the joints: Tighten all slip nuts by hand until snug, then use channel locks to add a final 1/4 to 1/2 turn. Avoid over-torquing plastic fittings, which can strip the threads or distort the internal washers.
Testing for Leaks and Troubleshooting Common Issues
Once the physical assembly is complete, verify all seals under operating conditions.
The Running Water Check: Turn the shut-off valves counterclockwise to restore water service. Run both hot and cold water through the faucet for two minutes while inspecting all connections beneath the cabinet with a flashlight.
The Hydrostatic "Bucket Test": Insert the sink stopper and fill the basin completely with water. Once full, pull the stopper to release the entire volume at once. This creates maximum hydrostatic head pressure throughout the drainage line, testing the structural integrity of your seals.
The Dry Paper Towel Test: Wrap clean, dry paper towels around each slip nut and the base of the strainer locknut. Even minor hairline leaks or weeping joints will quickly show up as dark, damp spots on the paper towel. Refer to our guide on troubleshooting sink drain drips if moisture appears at any threaded connection.
Common Mistakes to Avoid When Changing Kitchen Sink Drain Plumbing
Reversing or Omitting the Friction Ring: Placing the paper washer between the sink and the rubber gasket will ruin the seal. The paper ring must sit between the rubber gasket and the locknut to prevent the rubber from binding and twisting as the nut turns.
Overtightening Plastic Slip Nuts: Cranking plastic fittings past hand-tight plus a half-turn can warp the soft beveled washers or split the plastic nuts, causing persistent drips.
Reusing Degraded Gaskets: Always install the brand-new washers and gaskets included with your replacement drain kit. Old gaskets lose elasticity and develop permanent compression grooves that struggle to reseal.
Backward Slip Washers: Installing a beveled washer with its flat side toward the pipe joint prevents the compression nut from forcing the wedge into the gap, resulting in immediate leaks upon use.
Inadequate Horizontal Pitch: Allowing the horizontal trap arm to tilt backward toward the sink traps grease and solids, leading to frequent line clogs and gurgling drain sounds.
When to Call a Licensed Plumber
While changing a standard basket strainer is a manageable DIY job for many homeowners, certain situations require professional expertise:
Corroded Wall Pipes: If the threaded galvanized or copper drain arm entering the wall is rusted through, attempting to force fittings can break the pipe inside the wall cavity.
Extensive Cabinet Moisture and Mold: Undetected leaks that have damaged subflooring or caused structural mold require professional remediation and line replacement.
Complex Multi-Basin or Disposal Reconfigurations: Adding commercial-grade garbage disposals or routing multi-bowl drains with complex air gap requirements.
When unexpected pipe failures occur, our team at All Star Service & Repair provides fast emergency plumbing services across Northern Utah to restore your home's plumbing quickly and safely.
Frequently Asked Questions About Kitchen Sink Drains
What is the correct order for the sink drain gaskets underneath?
From the bottom of the sink downward, the correct assembly order is:
Underside of the sink basin
Thick rubber gasket (creates the watertight seal)
Thin paper/cardboard friction washer (prevents friction tears)
Metal or plastic locknut (threads onto the strainer body)
Can I use silicone caulk instead of plumber’s putty?
Yes. 100% silicone caulk is the recommended sealant when installing basket strainers on natural stone, granite, quartz, or composite sinks, as the oils in traditional plumber's putty can seep into porous stone and cause staining. When using silicone, wipe away excess immediately with denatured alcohol and allow the silicone to cure for 24 hours before running water.
What standard size replacement drain do I need for my kitchen sink?
Standard residential kitchen sinks feature a 3-1/2-inch drain opening, which accepts standard basket strainers with an outer flange diameter between 4-7/16 inches and 4-1/2 inches. Underneath, standard kitchen drainage piping uses 1-1/2-inch diameter tailpieces and P-traps (unlike bathroom sinks, which typically use 1-1/4-inch piping).
Conclusion
Installing a new kitchen sink drain assembly is an effective way to stop annoying under-sink leaks, eliminate musty odors, and refresh the appearance of your sink basin. By preparing the work area, seating the upper flange with the appropriate sealant, layering the under-sink gaskets in their proper order, and maintaining a clean downward slope along the P-trap assembly, you can complete this installation cleanly in under an hour.
If you encounter stubborn corroded plumbing, misaligned wall drain pipes, or persistent leaks during installation, review our complete guide on repairing kitchen sink drains or contact our licensed plumbing team at All Star Service & Repair for straightforward pricing, reliable service, and professional support throughout Utah County and surrounding areas.


Comments