DIY Garbage Disposal Replacement Made Surprisingly Easy

Updated: 3 days ago
A Simple Guide to Garbage Disposal Replacement

Garbage disposal replacement is usually a manageable DIY project when you are swapping an existing unit, the under-sink outlet or wiring is already in place, and the new disposal fits your sink setup.
Most same-mount replacements take about 1 to 2 hours, and doing the work yourself can save roughly $80 to $200 compared with hiring a plumber.
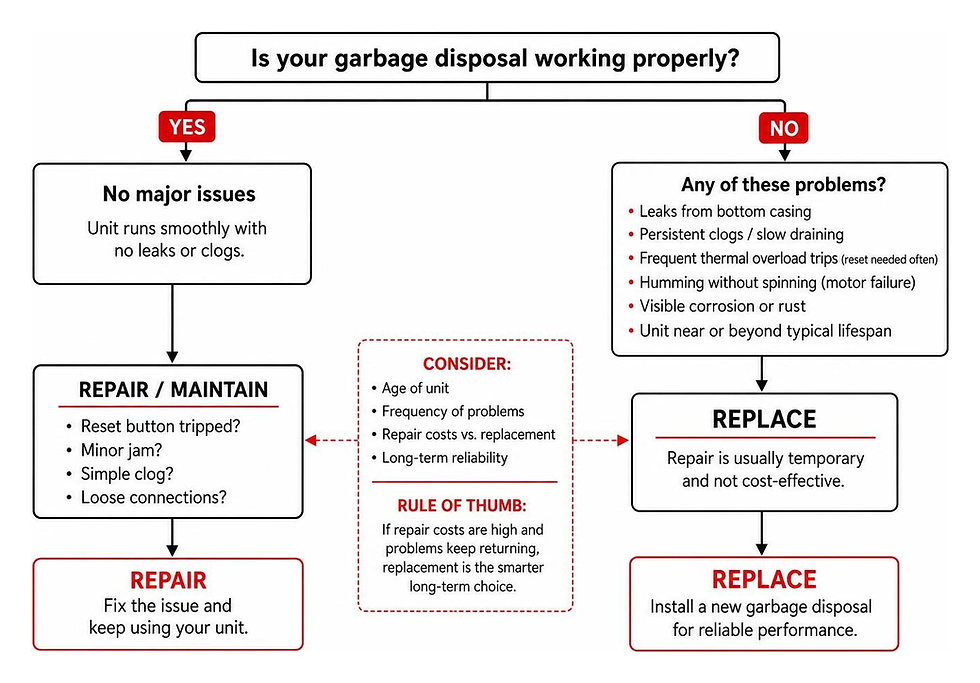
Before you start, make sure the old unit truly needs replacement. A reset button or simple jam may be fixable, but leaks from the disposal body, frequent clogs, repeated resets, corrosion, or a failing motor often point to a new unit.
The key is to shut off power at the breaker, support the disposal before removing it, reconnect the drain and dishwasher line correctly, and test every joint for leaks before using it.
I am Adam Wettach, owner of All Star Service & Repair, with hands-on experience diagnosing plumbing problems and completing reliable garbage disposal replacement work for homes and businesses.
Next, we will help you decide whether replacing your unit is the right call.

Repair vs. Replace: Planning Your Garbage Disposal Replacement
Knowing whether to fix your current unit or start fresh with a garbage disposal replacement can save you both money and frustration. Disposals are mechanical workhorses, but they do have an expiration date.
Entry-level disposals ($80–$130) typically last 5 to 8 years. Mid-range units ($150–$250) hold up for 8 to 12 years, while premium units ($300–$500+) equipped with stainless steel grind components often reach 10 to 15 years.
If your unit is approaching the end of its expected lifespan and making scary metallic screeching noises, paying $100 to $200 for a repair call rarely makes financial sense.
Here are clear signs that replacement is your best move:
Water leaking from the bottom casing: If water drips from the motor housing or near the bottom reset button, the internal mechanical shaft seals have failed. These seals cannot be repaired—the unit must be replaced.
Persistent clogs and slow draining: When internal impellers or grind rings wear down, food waste gets shredded coarsely rather than liquefied, leading to constant sink clogs.
Frequent thermal overload trips: If you find yourself pressing the red reset button at the bottom of the unit after every meal, the motor windings are overheating and failing.
Continuous humming without spinning: If clearing the flywheel manually with a hex wrench doesn't free the jam, the motor is burned out.
When choosing your new appliance, you will also choose between continuous feed and batch feed operating styles.
Feature | Continuous Feed | Batch Feed |
Operation | Runs via wall or air switch while cold water flows | Runs only when a magnetic stopper is twisted into the drain |
Safety | Requires attention so items don't fall in | Safest option; opening is physically covered during grinding |
Convenience | High; clean as you scrape dishes continuously | Moderate; food must be loaded in batches |
Popularity | Used in roughly 95% of American homes | Preferred by homes without dedicated wall switches or with small kids |
Price Point | Budget-friendly to premium range | Moderate to high price range |
DIY vs. Professional Garbage Disposal Replacement
Can you replace a garbage disposal yourself, or should you call a licensed professional? The answer depends on your existing setup and comfort level with basic plumbing and electrical work.
A standard DIY swap is ideal if you are replacing an existing disposal with a similar unit, a grounded outlet or existing hardwire connection is present under the sink, and your P-trap plumbing aligns nicely.
Handling the project yourself keeps your total costs between $75 and $200 for the unit alone, taking under two hours for most homeowners.
On the flip side, professional plumber installation costs $200 to $625 total (or $80 to $200 in pure labor fees if you supply the unit). You should hire a professional plumber or electrician if:
There is no electrical outlet or wiring under the sink.
The current plumbing is damaged, heavily corroded, or misaligned.
You are switching sink materials (e.g., thin composite or apron-front sink) that require custom flange sealing.
You simply prefer the peace of mind that comes with a guaranteed, leak-free installation.
For a deeper look into weighing home repairs, review our guide on diy plumbing repairs vs hiring a professional.
Selecting Horsepower and Brand Compatibility
Choosing the right motor size ensures your new disposal can handle your family's daily cooking habits without jamming. Disposal motors range from 1/3 horsepower (HP) up to 1 1/4 HP:
1/3 HP: Best for single-person households, light cooking, and soft food scraps. Motor speeds range from 1,700 to 3,800 RPM.
1/2 HP: Suitable for small households (1–2 people). Handles everyday cooked vegetables and light food waste, though it may struggle with dense scraps.
3/4 HP: The standard sweet spot for mid-sized families (3–4 people). Easily grinds tough waste like small bones, cooked meat, vegetable peels, and fruit pits while running significantly quieter.
1 HP to 1 1/4 HP: Built for large families, heavy daily meal prep, or home chefs. Features heavy-duty stainless steel components and advanced sound insulation.
Before purchasing, take note of brand mounting systems. Major manufacturers like InSinkErator (which accounts for roughly 70% of U.S. installations) utilize a standard 3-bolt quick-lock assembly.
If you replace an old InSinkErator with a new model from the same brand, you can usually keep the existing sink flange and mounting ring in place, saving yourself 20 to 30 minutes of tedious putty scraping.
However, if you switch brands—such as moving to Waste King, Moen, or GE—you must replace the mounting hardware completely to match the new unit's locking tabs. You can compare various models directly on Garbage Disposals.
Essential Tools and Safety Steps Before Removal

Having the right equipment on hand ensures your garbage disposal replacement goes smoothly without extra trips to the hardware store.
Gather these required tools and materials before starting:
Adjustable channel-lock pliers or pipe wrench
Non-contact voltage tester
Flathead and Phillips screwdrivers
Hammer and punch (or blunt screwdriver) for the dishwasher plug
Plumber's putty (approx. 0.1 kg) or included rubber sink flange gasket
Bucket and old towels or rags
Cable connector strain relief clamp
Wire nuts (size 54 or standard orange/yellow nuts)
Hex wrench (often provided with the new disposal)
Preparing the Workspace and Cutting Power
Safety comes first. Never rely solely on the under-sink wall switch to disconnect power, as wall switches can be inadvertently flipped on while your hands are inside the cabinet.
Shut off the breaker: Locate your main electrical service panel and switch off the circuit breaker feeding the garbage disposal and kitchen outlet.
Verify power is off: Flip the wall switch on and off to verify the motor does not turn on. For extra safety, touch a non-contact voltage tester to the electrical wires or power cord connection box under the sink to confirm no live voltage is present.
Clear under-sink storage: Remove cleaning supplies, baskets, and trash bins.
Prep for residual water: Place an empty bucket directly beneath the P-trap and drain lines, and lay down old towels to catch drips.
How to Safely Remove the Old Disposal
With power confirmed off, you are ready to disengage the old disposal unit.

Disconnect the drain plumbing
Use channel-lock pliers to loosen the slip nuts on the waste discharge pipe and P-trap. Pull the trap clear and let residual water drain into your bucket.
Disconnect the dishwasher line
If your dishwasher drains into the disposal, slide the spring hose clamp back with pliers and pull the rubber hose off the inlet nipple.
Disconnect electrical power
If corded: Unplug the unit from the wall receptacle.
If hardwired: Remove the electrical cover plate on the bottom of the disposal with a screwdriver. Twist off the wire nuts (black to black, white to white) and unbolt the green grounding screw to free the copper wire. Loosen the strain relief cable clamp and pull the household electrical wire out of the housing.
Unmount the unit
Disposals are heavy (12 to 25 pounds). Support the bottom of the unit with one hand, a car jack, or a stack of wooden blocks. Insert a screwdriver or the included mounting wrench into one of the lugs on the lower mounting ring.
Rotate the ring counterclockwise (to the left) roughly 1/4 turn. The unit will unlock and drop down into your hands.
Remove the old mounting assembly (if changing brands)
Loosen the three mounting screws on the upper ring. Pry off the snap ring using a flathead screwdriver, then push the old sink flange up through the top of the sink drain.
Clean away all leftover plumber's putty and mineral buildup from around the sink hole using a putty knife.
Step-by-Step Instructions for Installing a New Disposal

Now that the under-sink area is clean and empty, you can install your new garbage disposal replacement.
Installing Mounts and Removing the Dishwasher Knockout
If your home has a dishwasher connected to the disposal, you must complete one critical step before hanging the new unit: removing the internal dishwasher knockout plug.
Inside the small lateral inlet tube near the top of the disposal body sits a plastic factory plug. If you forget to remove it, your dishwasher will fail to drain, causing dirty water to back up all over your kitchen floor during its first rinse cycle!
To remove the plug:
Lay the new disposal on its side on the floor.
Insert a punch or blunt screwdriver into the dishwasher inlet tube from the outside.
Strike the end of the screwdriver firmly with a hammer until the plastic disk pops free inside the grinding chamber.
Reach inside the throat of the disposal (or tip the unit upside down) and retrieve the loose plastic disk. Do not leave the loose plug inside the chamber.
Next, install the new sink flange assembly (if you removed the old one):
Roll a piece of plumber's putty into a smooth rope about 1/2-inch thick and equal to the circumference of the flange opening.
Press the putty rope under the top lip of the new sink flange.
Press the flange firmly down into the sink drain opening from above.
To keep the flange seated while working underneath, place a towel over the flange and rest the heavy, new disposal unit on top of it as a weight.
From under the sink, slide the fiber gasket, backup flange, and mounting ring over the bottom shaft of the sink flange.
Snap the steel snap ring into the groove on the flange neck to lock the assembly in place.
Tighten the three mounting screws evenly with a screwdriver until the rubber gasket compresses tightly against the sink underside and excess plumber's putty squeezes out on top in the sink basin. Wipe away excess putty with a damp rag.
For further reference on manufacturer-backed mounting steps, check out Installing a Replacement Garbage Disposal.
Hardwired vs Plug-In Garbage Disposal Replacement Wiring
Before lifting the unit onto the mount, you must connect its electrical power source.

Option A: Cord-Connected (Plug-In)
If your unit came with a factory-installed power cord, simply verify the cord is anchored tightly with a strain relief connector and proceed to mounting. If you need to transfer an old power cord to a new unit:
Remove the bottom electrical plate on the new disposal.
Thread the cord through a strain relief clamp screwed into the access hole.
Strip 1/2 inch of insulation from wire ends if necessary. Connect black to black (hot), white to white (neutral), and secure the green ground wire eyelet under the green grounding screw.
Twist wire nuts securely over bare wire ends, push wires inside, and screw the cover plate back on.
Option B: Hardwired
Pull the flexible metal armor or Romex cable coming from the wall through a cable connector clamp installed on the disposal base hole.
Tighten the clamp screws so the wire cable cannot pull out.
Twist the hot (black) house wire to the black disposal lead, and neutral (white) house wire to the white lead using size 54 wire nuts.
Secure the bare copper ground wire tightly beneath the green ground terminal screw.
Tuck all wires neatly inside the compartment and reattach the electrical cover plate.
For detailed equipment recommendations, refer to our garbage disposal tool guide 2026.
Mounting, Drainage Hookup, and Leak Testing
With wiring complete and the dishwasher plug knocked out, hanging the disposal is remarkably quick:
Lift and align: Lift the disposal unit into position, aligning its three mounting tabs with the slide-up ramps of the lower mounting ring.
Twist to lock: Rotate the lower mounting ring clockwise (to the right) until all three mounting tabs lock securely over the ridges.
Lock firmly: Insert a screwdriver or wrenchette into a mounting ring lug and twist firmly until the unit clicks tightly into its fully locked position.
Attach discharge pipe: Insert the rubber gasket into the discharge outlet of the disposal. Bolt the elbow discharge pipe to the unit using the metal flange and screws.
Connect to P-trap: Align the discharge tube with your wall drain trap. Adjust discharge pipe length using a hacksaw if needed. Tighten slip nuts on the trap by hand, then snug them up 1/4 turn with channel-lock pliers.
Attach dishwasher hose: Slide the dishwasher drain hose over the inlet nipple and secure it with a stainless steel hose clamp. Ensure the hose forms a "high loop" anchored up near the underside of the countertop to prevent dirty sink water from back-flowing into the dishwasher.
Avoid These Common Mistakes During Installation
Even handy DIYers can fall into predictable traps during a garbage disposal replacement. Avoid these common pitfalls to keep your kitchen dry and operating quietly:
Forgetting the dishwasher knockout plug
As noted, leaving this plastic disk inside causes immediate dishwasher drain backups. Always confirm the disk is in the trash before hanging the motor.
Overtightening PVC slip nuts
Plastic drain fittings under the sink can crack under excessive force. Hand-tighten all plastic nuts first, then use pliers for an additional 1/4 turn only.
Using plumber's putty on plastic sinks or specific metals
Plumber's putty contains oils that can stain granite, composite sinks, or craze certain plastic materials. Use the rubber gasket supplied by the manufacturer or neutral-cure silicone sealant if recommended for sensitive sink surfaces.
Reusing old, corroded hose clamps
Spending $2 on fresh stainless steel hose clamps prevents unexpected fitting blowouts down the road.
Allowing the dishwasher hose to sag
Skipping the high loop or air gap allows wastewater from the sink to enter the dishwasher line, causing foul odors and unsanitary conditions.
Review our top tips to avoid these common plumbing mistakes on your next home improvement project.
Frequently Asked Questions About Replacing a Disposal
Do I need to replace the mounting ring when changing brands?
Yes. While most modern InSinkErator disposals share a standardized 3-bolt twist-lock assembly, other brands like Waste King (which often uses an EZ Mount collar) or Moen use different mounting mechanisms.
If you change brands, you must remove the old sink flange, scrape off the old putty, and install the new flange and mounting ring provided in your disposal kit. Reusing mismatched mounting hardware leads to vibrations and water leaks.
What happens if I forget to knock out the dishwasher plug?
If you forget to knock out the plug, your dishwasher will run its wash cycle normally until it attempts to drain. Because the disposal inlet remains blocked, dirty water cannot enter the grinding chamber.
Instead, it will back up into the bottom of your dishwasher tub or push back out through the air gap, spilling dirty water all over your countertop and floor.
If this happens, disconnect the dishwasher hose, tap out the plug from outside the inlet, retrieve the broken disk from inside the chamber with pliers, and reconnect the hose.
How do I test the new unit for water leaks?
Testing for leaks should always be done in two distinct phases before turning power back on:
Static fill test: Place the sink stopper in the drain opening. Fill the sink basin with 3 to 4 inches of cold water. Take a flashlight under the cabinet and inspect around the sink flange joint for any slow drips.
Dynamic flow test: Pull the sink stopper out to allow the water to rush down through the disposal all at once. Check every connection—the upper flange ring, the dishwasher inlet hose, the discharge pipe gasket, and all P-trap slip nuts.
Power test: Switch the circuit breaker back on and flip the wall switch while running cold water. Confirm the motor spins smoothly without unusual vibrations or rattles.
Conclusion
Completing a DIY garbage disposal replacement is an achievable, satisfying project that can save you $80 to $200 in plumbing costs.
By selecting the right motor size, preparing your workspace safely, removing the dishwasher knockout plug, and performing a thorough leak test, you will enjoy a clean, efficient kitchen setup for years to come.
If you run into stubborn plumbing connections, outdated wiring, or simply prefer professional installation handled by experienced local technicians in Provo and Northern Utah counties, our team is here to help.


Comments