The Ultimate DIY PRV Installation Handbook

Understanding Water Pressure Regulators and Why You Need One
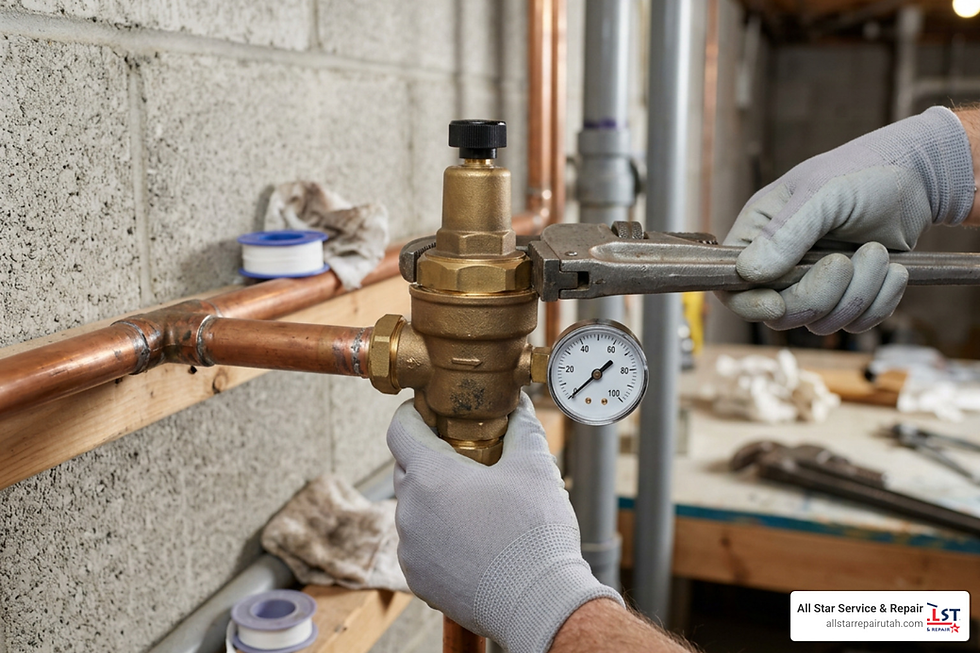
Completing a water pressure regulator valve installation is the single best way to protect your home's pipes and appliances from high-pressure water damage.
Quick Guide: How to Install a Water Pressure Regulator
Test the Pressure: Screw a manual pressure gauge onto an outdoor hose spigot. If the reading is over 80 PSI, you need a regulator.
Shut Off the Water: Close your home's main water shut-off valve and open a low-level faucet to drain the pipes completely.
Cut the Pipe: Measure your new valve, mark the main supply line, and carefully cut out the matching section of pipe.
Prep and Install Fittings: Clean the cut pipe ends, apply flux or Teflon tape, and secure the union connections.
Mount the Regulator: Align the valve's flow arrow with the direction of the incoming water, then tighten the union nuts.
Test and Adjust: Turn the water back on slowly and check for leaks. Adjust the top bolt to set your home's pressure between 50 and 60 PSI.
Most homeowners love strong water pressure. It makes showers feel great and fills pots quickly. But high water pressure is actually a silent threat to your plumbing system.
In rapidly growing areas across Northern Utah, cities often boost water pressure in the main utility lines to reach new neighborhoods. This means water can enter your home at a dangerous 150 PSI or more. Most indoor plumbing fixtures and appliances are only designed to handle about 50 to 60 PSI. Without a working regulator, this excess pressure causes noisy clanging pipes, leaky faucets, running toilets, and broken water heaters.
I am Adam Wettach, the owner of All Star Service & Repair, and I have spent years helping Utah families protect their properties with professional water pressure regulator valve installation services. My team and I are dedicated to providing honest, transparent plumbing support without any annoying sales tricks or unnecessary upsells.

A water pressure regulator—also known as a pressure reducing valve (PRV)—acts as a protective gatekeeper for your home’s plumbing. But how exactly does it work?
Inside the bell-shaped housing of a PRV is a spring-loaded diaphragm. This mechanism automatically responds to fluctuations in the incoming municipal water supply. When the high-pressure water from the city main enters the valve, it presses against the diaphragm. The spring resists this pressure, narrowing the internal opening to throttle the water flow. This ensures that the water downstream—the water flowing to your kitchen faucet, shower, and washing machine—remains at a safe, constant pressure.

Beyond protecting your home from catastrophic water damage, installing a PRV is a fantastic move for water conservation. High water pressure forces far more water through your fixtures than necessary. By regulating your home's water pressure down to an optimal 50 PSI, you can see up to a 30 percent decrease in water usage, leading to a much lower monthly water bill.
According to standard plumbing codes, a pressure regulator with an integrated strainer is required whenever the static water pressure from the municipal utility exceeds 80 PSI. If your system is running unregulated above this threshold, you are actively risking plumbing failures. We highly recommend scheduling a professional plumbing inspection to evaluate your system's health. If you are ready to secure your home, our team at AllStar Service & Repair offers comprehensive plumbing services to get your pressure exactly where it needs to be.
How to Test Your Home's Water Pressure
Before you dive into a water pressure regulator valve installation, you need to know your starting numbers. Testing your water pressure is a straightforward task that any homeowner can do with an inexpensive manual pressure gauge.
To get an accurate static pressure reading, follow these steps:
Purchase a standard water pressure gauge (calibrated up to 100 or 200 PSI) with a female hose thread connection.
Locate an outdoor hose bib (spigot) or a washing machine utility faucet.
Ensure that all water-using appliances inside the home—such as dishwashers, washing machines, and ice makers—are completely turned off. No faucets should be running.
Screw the pressure gauge tightly onto the hose bib.
Open the faucet fully and read the needle on the dial.
To capture peak pressure fluctuations, it is a smart practice to test your water pressure at different times of the day. Municipal water pressure fluctuates significantly and often spikes late at night when overall city-wide water usage drops. If your gauge reads consistently above 80 PSI, your plumbing is under constant stress. Regular plumbing maintenance and pressure monitoring are key to avoiding sudden system failures.
Signs You Need a Water Pressure Regulator Valve Installation
High water pressure does not always cause an immediate burst pipe; instead, it often shows up as chronic, annoying household plumbing issues. If you notice any of the following symptoms, your home is likely overdue for a PRV:
Banging Pipes (Water Hammer): When you turn off a faucet or your washing machine stops filling, you might hear a loud thudding or rattling sound inside your walls. This is water hammer, caused by high-velocity water slamming to a sudden halt.
Running Toilets: High pressure easily overpowers the delicate plastic fill valves inside your toilet tanks, causing them to constantly run or leak.
Leaking or Dripping Faucets: If you find yourself constantly replacing worn-out faucet cartridges and rubber O-rings, excess pressure is the likely culprit.
Gushing or "Jumping" Faucets: When you open a faucet and water blasts out violently, spitting and spraying everywhere, the line is over-pressurized.
Ignoring these warning signs can lead to pinhole leaks in your copper lines, ruptured washing machine hoses, and flooded crawlspaces. If you are already dealing with the aftermath of high pressure, do not wait to call for a professional water leak repair to secure your home.
Planning and Executing Your DIY Water Pressure Regulator Valve Installation
If you are a handy homeowner with some basic plumbing experience, installing a new PRV is a highly rewarding project. However, it does require cutting into your main incoming water line, which means your home will be without running water while you work.
One critical factor to plan for before beginning your water pressure regulator valve installation is thermal expansion. When you install a pressure regulator, it creates a "closed system." This means water can flow into your home, but it cannot push back out into the municipal main.
When your water heater heats cold water, that water expands. In an open system, the expanding water simply pushes back into the city supply. In a closed system created by a PRV, that expanding water has nowhere to go. This causes rapid, extreme pressure spikes that can wear out your water heater and trip its Temperature and Pressure (T&P) relief valve, causing it to drip.
To prevent this, you should install a thermal expansion tank on the cold water line feeding your water heater. If you need help with this step, we can assist with professional water heater installation and expansion tank calibration to ensure your system is perfectly balanced.
For a great visual overview of how these components fit together, check out the How to Install a Water Pressure Reducing Valve | This Old House video guide.
Choosing the Right Installation Location
Your water pressure regulator must be installed on your main water line, downstream of your water meter and main shut-off valve, but upstream of any indoor branch lines or your water heater.

Typically, you will find the ideal spot in your basement, crawlspace, garage, or utility closet right where the main water line enters the structure. Installing it here ensures that all indoor fixtures—and your water heater—are fully protected from high pressure. If your property has an irrigation system, some homeowners choose to install a dual-PRV setup: one at the meter box to protect the sprinkler lines, and a second one at the house entrance to protect indoor plumbing. Regular main water line maintenance will help ensure this critical entry point remains clean and accessible.
Required Tools and Materials for Water Pressure Regulator Valve Installation
Before shutting off your water supply, make sure you have every tool and material laid out. There is nothing worse than having your water turned off only to realize you are missing a critical fitting!
Water Pressure Regulator Valve: Ensure you select a lead-free model (compliant with the Reduction of Lead in Drinking Water Act) that matches your pipe size (typically 3/4-inch or 1-inch).
Union Fittings and Gaskets: We highly recommend choosing a PRV with union connections on both ends. This makes future replacements incredibly fast and easy.
Pipe Cutter: A rotating copper tube cutter for copper lines, or a PVC pipe cutter.
Teflon Tape and Pipe Dope: For sealing threaded connections.
Wrenches: Two high-quality adjustable wrenches or pipe wrenches.
Bucket and Towels: To catch residual water when cutting the line.
Pipe-Specific Materials:
For Copper: Lead-free solder, flux paste, emery cloth, and a propane blow torch.
For PVC: PVC primer, solvent cement, and threaded male adapters.
For Galvanized: Threaded unions and pipe thread sealant.
Step-by-Step Installation on Copper, PVC, or Galvanized Pipes
Once your tools are gathered, it is time to perform the physical water pressure regulator valve installation. The exact process depends on your home's piping material.

1. Copper Pipe Installation (Soldering/Sweating)
Shut off the water at the main water meter or street-level valve. Open the lowest faucet in your home to drain all remaining water from the vertical pipes.
Crucial DIY Tip: Any remaining water in a vertical copper pipe will absorb the heat from your torch, preventing the copper from reaching soldering temperature and causing a leaky "cold joint." Use a piece of bread or a utility vacuum to pull water away from the cut zone.
Measure your PRV along with its union fittings. Mark the section of copper pipe you need to remove. Cut the pipe carefully using your tube cutter.
Use emery cloth or a wire brush to clean the outside of the cut copper pipe ends and the inside of the union nipples until they are bright and shiny. Apply a thin layer of flux paste to both cleaned surfaces.
Slide the threaded union nuts onto the pipes before soldering the union nipples.
Sweat (solder) the union nipples onto the copper pipes. Keep your flame away from the regulator valve itself, as extreme heat will melt the internal rubber diaphragm and seals.
Once the soldered joints have cooled, place the rubber gaskets inside the union nuts, position the PRV (ensuring the arrow on the valve body points in the direction of the water flow), and tighten the union nuts securely using two wrenches.
2. PVC Pipe Installation
If your main service line is PVC, buy a pressure regulator designed specifically for PVC, or use threaded male PVC adapters.
Cut the PVC pipe cleanly. Deburr the edges.
Dry-fit your components to ensure perfect alignment.
Apply PVC primer and solvent cement to the pipe ends and the female adapters. Push them together and hold for 30 seconds to cure.
Wrap 3 to 5 layers of Teflon tape around the male threads of the adapters, apply a thin layer of pipe dope over the tape, and thread the PRV's union fittings onto the adapters. Tighten carefully; over-tightening plastic PVC fittings can easily crack them.
3. Galvanized Pipe Installation
Working with rigid galvanized pipe can be tricky because the pipes cannot be rotated. You must use union connections.
Cut out the designated section of galvanized pipe using a hacksaw or pipe cutter.
Use a pipe threading tool to cut new threads on the remaining pipe ends, or use specialized transition fittings.
Thread the female half of a union onto one pipe end and the PRV with its male union end onto the other, using plenty of pipe dope to seal the threads. Connect the two halves and tighten the union collar.
How to Replace and Adjust an Existing Water Pressure Regulator
If your home already has a pressure regulator but you are experiencing pressure spikes or drops, it is likely time for a replacement. Most water pressure regulators have a life expectancy of 10 to 15 years, but in harsh water conditions with high sediment, they can fail in as little as 4 to 12 years. Most manufacturers recommend replacing them every 5 years to guarantee optimal performance.

Replacing an existing PRV is usually much simpler than a fresh installation, especially if the old valve was installed with union connections.
Shut off the main water supply and open a faucet to depressurize the system.
Use two wrenches to loosen the union nuts on both sides of the old regulator. Hold the pipe steady with one wrench to avoid twisting and damaging your home's copper lines.
Remove the old valve and discard the old rubber gaskets.
Clean the threaded union faces to remove any old debris or mineral buildup.
Insert the new PRV with fresh rubber gaskets. Ensure the flow arrow points toward your home.
Hand-tighten the union nuts, then use your wrenches to snug them up. Do not over-torque them.
Turn the water supply back on very slowly, keeping an eye out for any leaks.
For a fast, step-by-step visual walkthrough of this process, watch Replace a PRESSURE REDUCING VALVE (Fast and Easy). If you run into tight spacing or rigid pipes that will not budge, our team at AllStar Service & Repair is ready to handle your plumbing replacement quickly and professionally.
Adjusting the Water Pressure After Installation
Most residential water pressure regulators come pre-calibrated from the factory to a standard 50 PSI. However, you may want to adjust this setting slightly to fit your home's specific layout (for example, raising it slightly if you have a multi-story home).
To adjust your pressure:
Locate the adjustment bolt and locknut on the top of the PRV's bell housing.
Loosen the locknut using a wrench.
To increase the downstream pressure, turn the adjustment bolt clockwise (screwing it into the housing). This increases the tension on the internal spring.
To decrease the downstream pressure, turn the adjustment bolt counter-clockwise (screwing it out of the housing).
Crucial Step: Always open a downstream faucet briefly to relieve pressure while making adjustments, then close it and check your pressure gauge to see the new static reading.
Once you reach your target pressure (ideally between 50 and 60 PSI), tighten the locknut to secure the adjustment bolt in place.
Common Mistakes to Avoid During Installation
Plumbing projects leave very little room for error. A small mistake can lead to a major leak or a completely non-functional water system. Keep this quick reference guide in mind to ensure your installation goes smoothly:
Installation Aspect | Correct Practice | Incorrect Practice (Avoid!) |
Flow Direction | Align the arrow on the valve body with the direction of water entering the home. | Installing the valve backward (blocks water flow entirely). |
Union Connections | Install unions on both sides of the valve for easy future maintenance. | Soldering or gluing the valve directly into the pipe line. |
Soldering Proximity | Solder union nipples separately, letting them cool before attaching the valve. | Applying a blow torch flame directly to the valve body. |
Fitting Tension | Hand-tighten threaded joints, then snug them up gently with a wrench. | Overtightening threaded PVC or copper fittings (cracks the threads). |
Thermal Expansion | Install an expansion tank on the water heater cold line to handle closed-system expansion. | Ignoring thermal expansion (causes dripping T&P valves and appliance wear). |
Frequently Asked Questions About PRV Installation
How long does a water pressure regulator last?
While the typical life expectancy of a water pressure regulator is between 10 to 15 years, they can fail much earlier. In systems with high municipal sediment or extreme incoming pressure spikes, a PRV can fail in 4 to 12 years. Most manufacturers recommend replacing them about once every five years as a preventative measure to protect expensive household appliances.
Will a water pressure regulator lower my water bill?
Yes! Installing a water pressure regulator can reduce your home's overall water consumption by approximately 30 percent. By lowering the flow rate and static pressure running through your faucets, showers, and toilets, you waste significantly less water, leading to noticeably lower monthly utility bills.
What is the ideal water pressure setting for a home?
Most home plumbing fixtures and appliances are designed to work best at a pressure of approximately 50 PSI. The safe, acceptable operating range is between 30 and 80 PSI. Keeping your home's pressure set to a comfortable 50 to 60 PSI balances great shower pressure with maximum fixture protection.
Conclusion
Taking on a water pressure regulator valve installation is a fantastic way to secure your home's plumbing, prevent water hammer, and lower your monthly utility bills. While a handy DIYer can certainly manage a standard replacement, cutting into your main water line and soldering copper joints can quickly become overwhelming if you run into rigid pipes, tight spacing, or unexpected leaks.
At AllStar Service & Repair, we believe in absolute integrity, transparency, and straightforward pricing. We never use high-pressure sales tactics, and we are proud to serve families throughout Provo and Northern Utah counties. If you would rather leave this critical job to the professionals, explore our options for pressure regulators or contact us today to schedule your service. We are always here to help keep your home running safely and smoothly!


Comments