How to Service a Water Softener in 5 Easy Steps

Updated: Oct 7
Why You Need to Service a Water Softener Before It Fails

Knowing how to service a water softener can be the difference between a system that lasts 15–20 years and one that breaks down in under a decade. Here's a quick overview of what the full process involves:
How to Service a Water Softener in 5 Steps:
Check salt levels — Inspect monthly, refill to half-full, and break up any salt bridges or mushing
Clean the brine tank — Scrub with mild dish soap and sanitize with diluted bleach every 1–3 years
Clean the resin bed — Add a resin cleaner to the brine well and run a manual regeneration cycle every 6 months
Exercise the bypass valve and clean the venturi assembly — Rotate the valve monthly to prevent seizing; rinse the venturi screen semi-annually
Recalibrate settings and trigger regeneration — Verify hardness settings match your water supply and confirm the regeneration cycle completes correctly
A water softener works quietly in the background every day, pulling calcium and magnesium out of your home's water supply through a process called ion exchange.
Most Utah homeowners don't think about it — until the dishes come out spotty, the laundry feels stiff, or the soap stops lathering the way it used to.
The problem is that neglect adds up fast. A well-maintained system can last 15–20 years. One that's ignored may need major repairs or full replacement within 8–10 years. Annual upkeep costs roughly $40–$80.
A single plumber service call runs $150–$300. Resin replacement alone can cost $300–$500 — and it's almost always avoidable.
I'm Adam Wettach, owner of All Star Service & Repair, and I've spent years helping Utah homeowners diagnose and service a water softener before small problems turn into expensive repairs.
In this guide, I'll walk you through every step of the process in plain language, so you can handle routine maintenance yourself and know exactly when it's time to call a pro.

Key Signs Your Water Softener System Needs Servicing
Your home usually gives you clear warning signs when your water treatment system isn't functioning at peak efficiency.
Understanding these early indicators allows you to intervene before minor mineral buildup turns into severe plumbing issues across your household fixtures.
Mineral Scale and White Crust
If you notice crusty white deposits forming around showerheads, sink faucets, or inside your dishwasher, calcium and magnesium minerals are slipping past your system unhindered.
Stiff, Scratchy Laundry
Clothes washed in unconditioned water tend to feel rough, fade quickly, and trap soap scum inside fabric fibers.
Spotty Dishes and Glassware
Cloudiness or white film on glasses right out of the dishwasher is a classic sign of hard water breakthrough.
Low Water Pressure Throughout the Home
Heavy mineral scale inside your plumbing lines, or sediment and degraded resin beads clogging your water treatment unit, will cause household water pressure to drop unexpectedly.
Sudden Hard Water or Soap Non-Lathering
If body wash, shampoo, or hand soap suddenly stops lathering easily, your softener has likely stopped regenerating or ran out of usable salt brine.
Elevated Salt Consumption (or Zero Salt Consumption)
If you find yourself pouring in bag after bag without normal routine intervals—or conversely, if the salt level hasn't dropped an inch in three months—a mechanical or bridging issue is present.
To better understand how unmanaged minerals degrade your home's infrastructure over time, review our guide on the effects of hard water on your utah plumbing.
For additional routine checks, refer to this comprehensive Water Softener Maintenance Guide for Smooth Performance.
How to Service a Water Softener: The 5-Step DIY Guide
Performing regular preventative maintenance protects your initial investment, yields massive operating cost savings, and ensures optimal system longevity.
Taking an hour every few months to inspect and tune your water equipment prevents sudden midnight breakdowns and saves you hundreds of dollars in plumbing bills.
Before starting, gather these simple household maintenance tools:
A rubber mallet or wooden broom handle
A 5-gallon bucket and a wet-dry vacuum
Mild liquid dish soap and a long-handled scrub brush
Standard unscented household bleach (5.25% concentration)
Liquid resin cleaner (specially formulated for water softeners)
Water hardness testing strips
Step 1: Check Salt Levels, Clear Salt Bridges, and Salt Mushing
The brine tank relies on a consistent ratio of salt to water to generate the saline solution required to recharge the resin bed. Checking your salt level should be done once every 4 to 6 weeks.
Maintaining the Correct Salt Level
Keep the salt level at least 1/3 to 1/2 full at all times, making sure it sits a few inches above the water level inside the tank. However, avoid packing salt all the way to the top lid.
Overfilling traps moisture in the upper chamber, dramatically increasing the risk of salt bridging.
Identifying and Clearing a Salt Bridge
A salt bridge is a hardened dome of salt that crusts over near the middle of the tank, creating a hollow air pocket above the water layer below. To the naked eye, the tank appears full, but water cannot touch the salt to create brine.
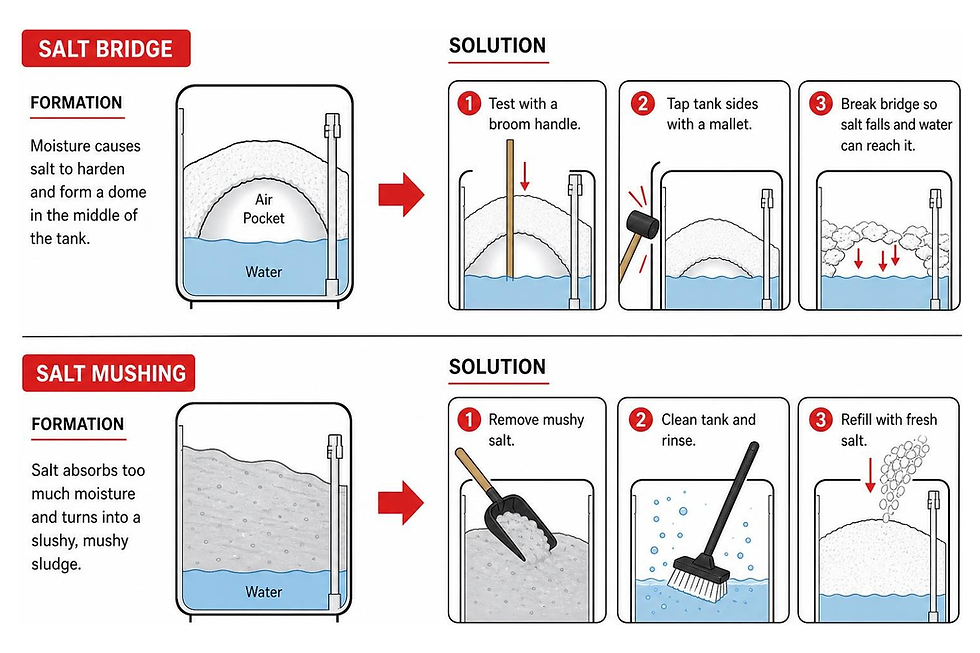
Perform the broom handle test: Take a blunt wooden handle or broomstick and gently push down into the center and sides of the salt mass.
If the broomstick hits a hard obstacle but yields into empty space below with a sudden crack, you have a salt bridge.
Gently strike the side of the brine tank with a rubber mallet, or use light downward pressure with your broom handle to break up the hardened salt crust. Avoid sharp metal tools that could puncture the plastic tank wall.
Identifying and Removing Salt Mushing
Salt mushing occurs when dissolved salt recrystallizes at the bottom of the brine tank into a thick, sludgy paste. This sludge blocks the brine draw tube, preventing the system from drawing brine during regeneration cycles.
If your broomstick sinks through soft salt but hits a dense, immovable sludge layer at the bottom of the tank, salt mushing has occurred.
Scoop out the top layer of dry, usable salt and set it aside in clean buckets.
Use a wet-dry vacuum to remove standing water and sludgy salt residue from the bottom.
Pour 2 to 3 gallons of warm tap water into the bottom to dissolve remaining salt sludge, vacuum it clean, and refill with fresh salt.
Water Softener Salt Comparison
Selecting the right type of salt plays a massive role in preventing salt bridges, sludge, and valve clogging.
Salt Type | Purity Level | Bridge & Mushing Risk | Residue Buildup | Recommended Usage |
Evaporated Salt Pellets | 99.99% Pure | Extremely Low | Minimal to None | Best choice for all standard systems |
Solar Salt Crystals | 99.6% Pure | Low to Moderate | Low | Great for average household water demand |
Rock Salt | 95-98% Pure | High | High (Dirt & Insoluble Rocks) | Not recommended (Clogs valves and pumps) |
Block Salt | 99.8% Pure | Low | Low | Only for specialized compact softeners |
Step 2: Deep Clean and Sanitize the Brine Tank

Even when using pure evaporated pellets, insoluble dirt, gravel, and airborne dust accumulate in the brine tank over time. Most manufacturers recommend deep cleaning and sanitizing the brine tank every 2 to 3 years to maintain smooth operations.
Here is the step-by-step procedure to deep clean your brine tank:
Bypass the System
Turn the bypass valve handles on the back of your control head to the "Bypass" position so household water flows directly past the system during servicing.
Empty the Tank
Scoop out clean salt into a clean bucket. Use a wet-dry vacuum to suck out old brine water and bottom sludge.
Inspect Internal Components
Examine the brine well, grid plate, and safety float valve for cracks, sediment blockage, or mechanical wear. If you notice persistent drainage issues, see our detailed guide on brine tank full of water how to fix.
Scrub the Interior
Mix warm water with a few drops of mild liquid dish soap. Use a soft, long-handled scrub brush to clean dirt off the interior walls and bottom grid.
For full instructions on cleaning individual tank models, check out our guide on how to clean water softener tank.
Rinse and Sanitize
Rinse away all soap residue thoroughly with clean water, then vacuum dry. To sanitize the brine tank, mix 1/4 cup of unscented household bleach into 2 to 3 gallons of clean water.
Pour this solution into the tank, scrub the walls lightly, and let it sit for 15 minutes before vacuuming it out completely.
Refill and Restore
Return clean salt to the tank until it is roughly half-full. Pour 2 to 3 gallons of clean water into the tank, turn the bypass valve back to "Service" mode, and wait 6 to 8 hours for the brine to reach proper saturation before starting a regeneration cycle.
Step 3: How to Service a Water Softener Resin Bed and Restore Efficiency
Inside the main tall fiberglass tank sit millions of microscopic plastic resin beads. These resin beads carry a negative electrical charge that attracts and binds positively charged hard water minerals (calcium, magnesium, and dissolved iron).
Over time, sediment, heavy iron deposits, and municipal chlorine can foul the resin media, drastically reducing its ion exchange capacity.
While resin beads typically enjoy a 10 to 15 year lifespan, neglecting routine maintenance or running water with unmanaged clear-water iron can ruin resin in as little as 3 to 5 years.
To clear mineral buildup and restore exchange capacity, flush the resin bed every 6 months using a specialized liquid resin cleaner:
Locate the vertical plastic pipe inside the brine tank (the brine well). Remove the cap.
Measure the exact dosage recommended by the resin cleaner manufacturer (typically 4 oz to 12 oz per cubic foot of resin).
Pour the liquid cleaner directly down into the brine well tube. If your unit does not have a separate brine well, pour the liquid directly into the salt tank when salt levels are low.
Allow the cleaner to settle into the brine solution for 15 to 30 minutes.
Manually initiate a regeneration cycle on your electronic control valve board. The system will draw the cleaner through the resin tank during the brine draw phase, stripping away trapped iron and mineral accumulation.
For an in-depth breakdown of diagnosing worn media and replacing depleted beads, review our post repair water softener resin tank guide.
Step 4: Exercise the Bypass Valve and Clean the Venturi Assembly

The bypass valve allows you to divert incoming hard water around the water softener whenever you perform routine maintenance, irrigate the lawn, or handle emergency plumbing repairs.
Because bypass valves sit still for long periods, minerals can lock them in place. Rotating or pushing the valve handles monthly exercises internal seals, preventing seizing and keeping the valve operating smoothly.
For step-by-step instructions on handling different valve configurations, read our full article on post bypass valve water softener.
Cleaning the Venturi and Nozzle Assembly
The venturi and nozzle assembly creates the vacuum suction required to pull saline brine out of the brine tank and pass it over the resin bed.
If sand, silt, or iron clogs the small plastic screen or tiny internal ports inside the venturi, the system will fail to draw brine, leaving your brine tank full of water and your home supplied with hard water.
Bypass and Relieve Pressure
Switch the bypass valve to "Bypass" position. Manually initiate a regeneration cycle for a few seconds to vent internal pressure inside the control valve head, then unplug the electrical power transformer.
Remove Venturi Cap
Locate the small housing cap on top or side of the main valve body (held in place by two screws or a plastic retainer clip). Carefully unscrew and lift off the cover.
Remove Internal Components
Carefully lift out the plastic venturi screen, nozzle, gasket, and small red/blue flow plugs using small needle-nose pliers or tweezers.
Clean the Parts
Soak all plastic parts in warm water mixed with mild soap or resin cleaner. Use a wooden toothpick to clear debris out of tiny internal ports. Never use metal pins or wire drills, which can scratch or enlarge precision plastic orifices.
Reassemble
Inspect black rubber O-rings for cracks or tearing, lubricate them lightly with 100% silicone grease (never use petroleum jelly like Vaseline), reinsert the components, and hand-tighten the cover cap.
Step 5: Recalibrate Hardness Settings and Trigger Regeneration
Even a clean system will yield poor performance if the electronic controller isn't calibrated properly to match raw water conditions.
Test Water Hardness
Use a fresh water testing strip on an untreated cold water faucet (such as an outside hose bib) to measure raw incoming water hardness in Grains Per Gallon (GPG).
Calculate Compensated Hardness
If your water test reveals clear-water iron or manganese (common in Utah well water supplies), you must adjust your total hardness setting. Use this industry standard formula:
Example: If your raw water tests at 15 GPG hardness and 1 PPM dissolved iron, calculate: 15 + (1 x 4) = 19 GPG. Enter 19 into your digital control head.
Verify System Clock
Ensure the controller displays the correct time of day. Most demand-initiated regeneration softeners default to 2:00 AM for cycle times to avoid feeding hard water to household taps during peak waking hours.
Trigger a Manual Regeneration Cycle
Press and hold the "REGEN" or "RECYCLE" button on the digital faceplate for 3 to 5 seconds to force an immediate system recharge. Listen for internal drive motors engaging and verify water drains properly out the backwash hose.
For a broader walkthrough on diagnosing valve errors and setting digital timers, read this detailed guide on A Step by Step Guide to Water Softener Repair.
DIY Servicing vs Professional Maintenance
Managing basic care tasks like topping off salt pellets and flushing resin media is straightforward for most homeowners.
However, knowing the cost differences between self-guided care and calling a technician helps you budget wisely over the lifespan of your system.

Step-by-Step Maintenance Schedule
Following a strict maintenance calendar ensures long-term operational efficiency:
Monthly: Inspect salt levels (keep 1/3 to 1/2 full). Push broom handle down to check for hidden salt bridges. Rotate bypass valve handles back and forth to maintain seal flexibility.
Every 6 Months: Clean venturi nozzle assemblies and filter screens. Pour dedicated resin cleaner into the brine well and run a manual regeneration cycle.
Annually: Sanitize the resin bed and system pipework using unscented bleach or specialized sanitizing solutions. Check clock accuracy and run water testing strips to verify GPG hardness.
Every 2 to 3 Years: Complete a deep clean on the brine tank by vacuuming out sludge, scrubbing walls with soap, and rinsing internal components.
When to Call a Professional to Service a Water Softener
While basic upkeep is simple, certain mechanical and electrical issues demand professional expertise, specialized tools, and genuine factory replacement parts:
Persistent Hard Water: If water remains hard despite full salt levels, clean venturi parts, and confirmed regeneration cycles.
Continuous Leaking or Water Overflowing: Water pooling beneath control heads or brine tanks overflowing uncontrollably onto mechanical room floors.
Resin Beads Discharging in Faucets: Tiny golden or amber beads appearing in faucet aerators, toilet tanks, or showerheads indicate broken internal distributor tube baskets inside the resin tank.
Error Codes and Motor Failures: Control board displays showing persistent error messages (e.g., Error 1, Error 2), stripped drive gears, or burned-out rotor motors.
When complex repairs surface, our team at All Star Service & Repair is ready to assist. Explore our professional water softener repair offerings, or schedule a comprehensive system evaluation via our dedicated water softener inspection page.
Frequently Asked Questions About Water Softener Maintenance
How often should you check and refill salt in a water softener?
Check salt levels once every 4 to 6 weeks. Always keep the tank at least 1/3 to 1/2 full, keeping salt pellets elevated above standing water levels. Avoid filling salt to the top rim to prevent moisture crusting and bridge formation.
How do you fix a salt bridge vs salt mushing in a brine tank?
A salt bridge is a hard top crust with hollow space underneath; break it apart by gently tapping the tank exterior with a rubber mallet or pushing down with a wooden broom handle.
Salt mushing is dense, sludgy salt recrystallized at the bottom; fix it by scooping out top dry salt, vacuuming out liquid sludge, and flushing the tank bottom with warm water.
How do you sanitize a water softener system safely?
Pour 1/2 cup (4 fl oz) of standard unscented 5.25% household bleach directly into the brine well tube (or directly into the brine tank if no well exists). Immediately initiate a manual regeneration cycle.
Allow the cycle to finish completely, then run cold tap water at a laundry sink for 5 minutes to clear residual chlorine trace before using household water.
Conclusion
Taking the time to service a water softener through routine preventative care guarantees high water quality, protects your home's internal plumbing, and extends equipment lifespan up to 15 to 20 years.
Simple monthly checks on salt levels combined with semi-annual resin flushes and periodic venturi cleaning prevent costly premature system replacements.
If you are dealing with complex valve errors, low water pressure, or persistent hard water across Northern Utah, trust our team to get your home water running perfectly.


Comments